Transfer Shopify prices to eSagu via n8n: Create the workflow
In Part 1, we connected Shopify and eSagu to n8n and stored the required credentials. In this second part, we create the actual workflow.
The workflow responds to product changes in Shopify, retrieves the Amazon SKU and minimum price from Shopify metafields, and uses them to find the corresponding item in eSagu. n8n then sends the minimum, fixed, and maximum prices to the eSagu API.
Requirements
Before you begin, make sure the following requirements are met:
- The Shopify and eSagu credentials from Part 1 are stored in n8n.
- The Shopify item has an Amazon SKU that matches the SKU of the item in eSagu.
- Shopify contains metafields for the Amazon SKU and Amazon minimum price.
- A minimum price has been entered for the relevant Shopify product.
1. Create the workflow
- In the n8n overview, click Create workflow in the top-right corner.

-
Name the workflow, for example,
Shopify x eSagu Connector. -
Click Add first step.

2. Configure the Shopify trigger
-
Search for Shopify.
-
Select On product updated from the available triggers.

-
Under Credential to connect with, select the Shopify credentials configured in Part 1.
-
Keep Product Updated selected under Trigger On.

-
Click Execute step, then update a product in Shopify. n8n waits for the corresponding event.
-
Verify that n8n successfully receives the product data.

- For clarity, rename the step to
Shopify Trigger - On product updated.

3. Prepare the Shopify metafields
This workflow requires two product metafields:
- Amazon minimum price
- Amazon SKU
You can find the metafields in Shopify under Settings → Metafields and metaobjects → Products.

Metafield for the minimum price
The example uses the following definition:
- Name:
Amazon Minimum Price - Namespace and key:
custom.amazon_minimum_price - Type: Money
Only the key is required for the subsequent n8n configuration:
amazon_minimum_price
Metafield for the Amazon SKU
The example uses the following definition:
- Name:
Amazon SKU - Namespace and key:
custom.amazon_sku - Type: Single line text
The following key is required for the subsequent n8n configuration:
amazon_sku
You can use different names and keys. What matters is that the actual keys are entered in the workflow configuration.
4. Add the workflow configuration
-
Click the plus icon after the Shopify trigger.
-
Search for Edit Fields (Set) and add the step.

-
Rename the step to
Workflow Configuration. -
Use Manual Mapping mode and create the following fields:
| Field | Type | Example value |
|---|---|---|
shopifyShopName |
String | esagu-test-shop |
shopifyApiVersion |
String | 2026-07 |
amazonMinPriceMetafieldKey |
String | amazon_minimum_price |
amazonSkuMetafieldKey |
String | amazon_sku |
maxPricePercentage |
Number | 0.2 |
fixedPricePercentage |
Number | 0.1 |
esaguApiUrl |
String | https://api.esagu.de/amzn/repricing/v1 |

shopifyShopName contains only the part before .myshopify.com. For the shop exampleshop.myshopify.com, enter exampleshop.
The values 0.1 and 0.2 correspond to 10 and 20 percent, respectively. With a minimum price of EUR 13.37, the workflow calculates:
- Minimum price:
EUR 13.37 - Fixed price:
EUR 14.71 - Maximum price:
EUR 16.04
Use an API version supported by Shopify. If you use a different version, adjust shopifyApiVersion accordingly.
5. Retrieve product metafields from Shopify
The product update from the trigger does not contain all required metafields. The next step therefore retrieves the complete metafield data via the Shopify GraphQL Admin API.
-
Click the plus icon after Workflow Configuration.
-
Search for HTTP Request and add the step.

- Configure the following settings:
- Method:
POST - Authentication:
Predefined Credential Type - Credential Type:
Shopify OAuth2 API - Shopify OAuth2 API: the Shopify credentials configured in Part 1
- Send Body: enabled
- Body Content Type:
JSON - Specify Body:
Using JSON
- Enter the following expression as the URL:
https://{{ $('Workflow Configuration').first().json.shopifyShopName }}.myshopify.com/admin/api/{{ $('Workflow Configuration').first().json.shopifyApiVersion }}/graphql.json- Enter the following GraphQL query in the JSON field:
{
  "query": "query ($id: ID!) { product(id: $id) { id title metafields(first: 25) { nodes { namespace key type value } } } }",
  "variables": {
    "id": "gid://shopify/Product/{{ $('Shopify Trigger - On product updated').item.json.id }}"
  }
}
The query retrieves the product ID, title, and up to 25 metafields. If a product has more than 25 relevant metafields, adjust the value in metafields(first: 25) or add pagination.
- Click Execute step and verify that Shopify returns the product and metafield data.

- Rename the step to
HTTP Request - Shopify Metadata.

6. Prepare the SKU and price values
The eSagu API processes price values in cents. A Shopify minimum price of EUR 13.37 is therefore transmitted as 1337.
- Add another Edit Fields (Set) step after HTTP Request - Shopify Metadata.

-
Name the step
Edit Fields - Extract meta objects by name. -
Select Manual Mapping mode.
-
Create the following fields.
Shopify Product ID
- Field name:
Shopify Product ID - Type:
String - Value:
{{ $json.data.product.id }}SKU / ID
- Field name:
SKU / ID - Type:
String - Value:
{{ $json.data.product.metafields.nodes.find(m => m.key === $('Workflow Configuration').first().json.amazonSkuMetafieldKey)?.value ?? null }}Min price
- Field name:
Min price - Type:
Number - Value:
{{ (() => {
  const config = $('Workflow Configuration').first().json;
  const key = config.amazonMinPriceMetafieldKey;
  const metafield = $json.data.product.metafields.nodes.find(m => m.key === key);
  const amount = metafield
    ? JSON.parse(metafield.value)?.amount * 100
    : null;

  return Math.round(amount);
})() }}
Fixed price
- Field name:
Fixed price - Type:
Number - Value:
{{ (() => {
  const config = $('Workflow Configuration').first().json;
  const key = config.amazonMinPriceMetafieldKey;
  const fixedPricePercentage = config.fixedPricePercentage;
  const metafield = $json.data.product.metafields.nodes.find(m => m.key === key);
  const amount = metafield
    ? JSON.parse(metafield.value)?.amount * 100
    : null;

  return Math.round(amount + (amount * fixedPricePercentage));
})() }}
Max price
- Field name:
Max price - Type:
Number - Value:
{{ (() => {
  const config = $('Workflow Configuration').first().json;
  const key = config.amazonMinPriceMetafieldKey;
  const maxPriceMarkupPercentage = config.maxPricePercentage;
  const metafield = $json.data.product.metafields.nodes.find(m => m.key === key);
  const amount = metafield
    ? JSON.parse(metafield.value)?.amount * 100
    : null;

  return Math.round(amount + (amount * maxPriceMarkupPercentage));
})() }}
- Execute the step. The output should contain the Shopify product ID, the SKU, and the three prices.
The example shown produces:
{
  "Shopify Product ID": "gid://shopify/Product/15955548275022",
  "SKU / ID": "01-0164",
  "Min price": 1337,
  "Fixed price": 1471,
  "Max price": 1604
}
7. Find the item in eSagu by SKU
- Add an HTTP Request after the previous step.

-
Name the step
HTTP Request - Find item in eSagu via SKU. -
Configure the following settings:
- Method:
GET - URL:
{{ $('Workflow Configuration').first().json.esaguApiUrl }}/item- Authentication:
Generic Credential Type - Generic Auth Type:
Bearer Auth - Bearer Auth: the eSagu credentials configured in Part 1
- Enable Send Query Parameters and enter the following parameters:
| Name | Value |
|---|---|
by-sku-exact |
true |
by-sku |
{{ $json['SKU / ID'] }} |
- Execute the step. The response must contain exactly the eSagu item whose SKU matches the Shopify metafield.

8. Validate the API response
Before changing any prices, the workflow checks whether the request was successful and returned exactly one item.
- Add an If step after the eSagu item search.
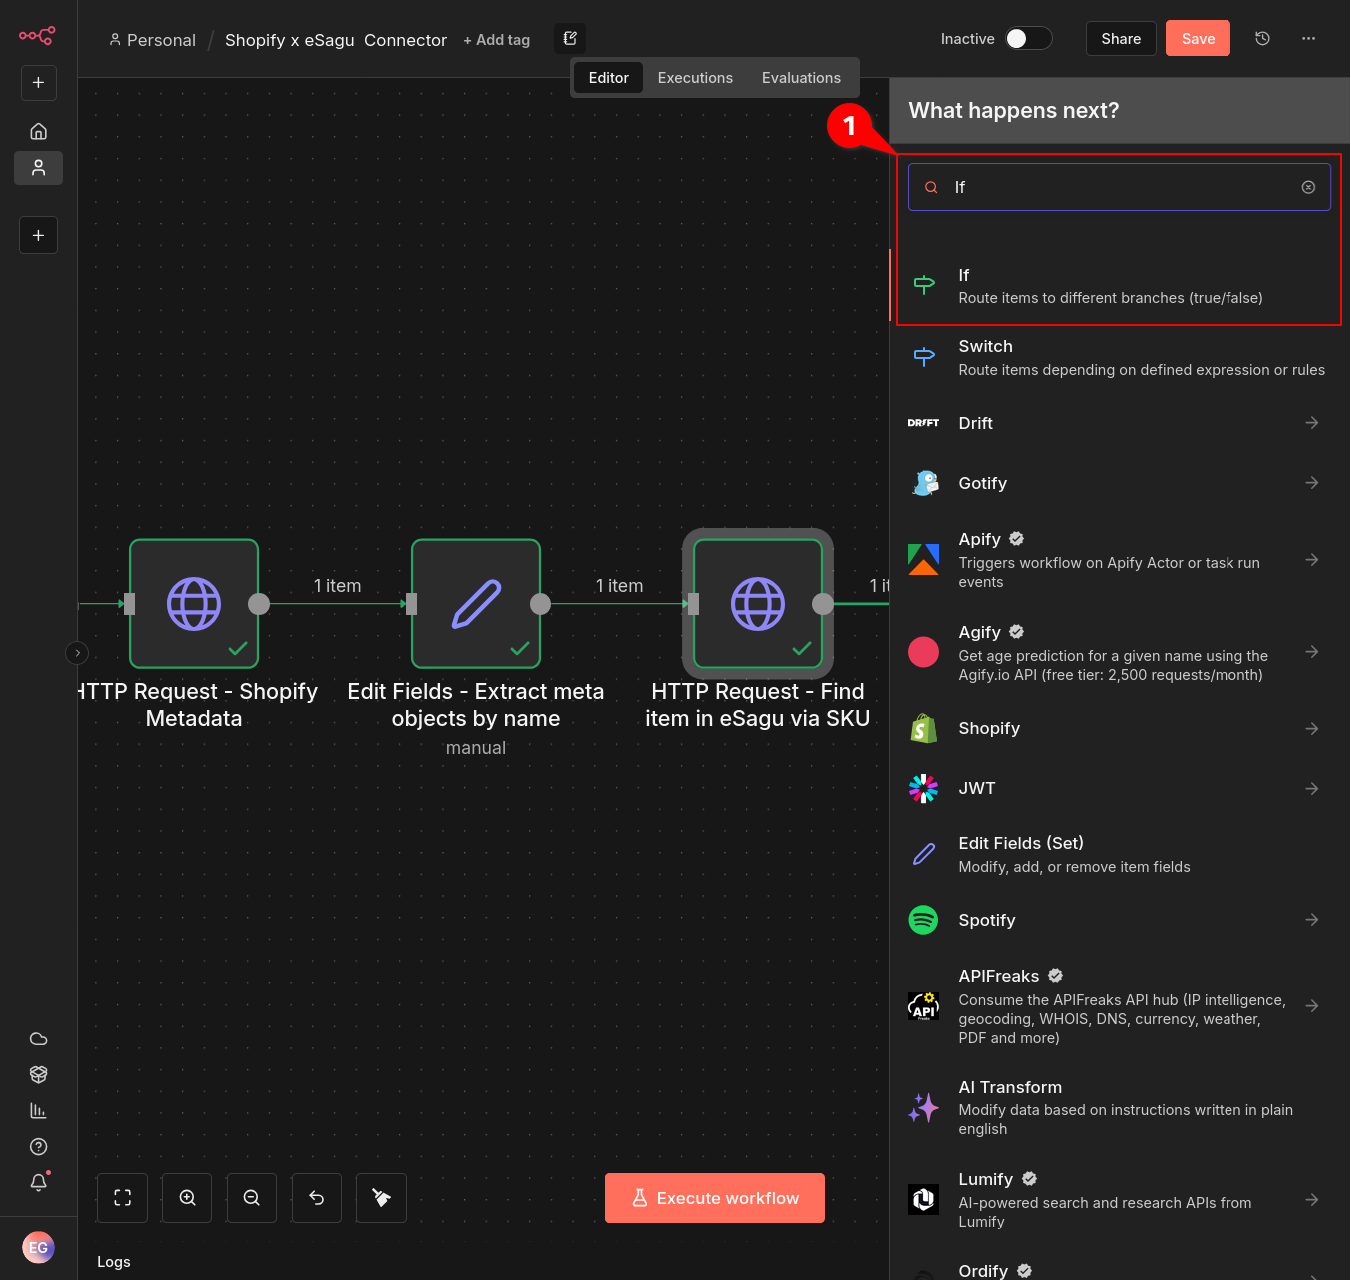
-
Name the step
If - Check for eSagu API errors. -
Combine two conditions using AND:
First condition:
- Value 1:
{{ $json.statusCode }} - Operator: is less than
- Value 2:
399
Second condition:
- Value 1:
{{ $json.body.length }} - Operator: is equal to
- Value 2:
1

Only the true output is connected to the subsequent steps. The workflow therefore makes no changes if the API returns an error or the SKU cannot be mapped unambiguously.
9. Simplify the eSagu response
- Add another Edit Fields (Set) step to the true output of the If step.

-
Name the step
Edit Fields - Simplify response. -
Create a field with the following settings:
- Field name:
body - Type:
Object - Value:
{{ $json.body.find(() => true) }}-
Keep Include Other Input Fields disabled.
-
Execute the step and verify that
bodynow directly contains the item object that was found.

10. Transfer the price limits to eSagu
- Add another HTTP Request after Edit Fields - Simplify response.

-
Name the step
HTTP Request - Edit item. -
Configure the following settings:
- Method:
PUT - URL:
{{ $('Workflow Configuration').first().json.esaguApiUrl }}/item/{{ $json.body.id }}/strategy- Authentication:
Generic Credential Type - Generic Auth Type:
Bearer Auth - Bearer Auth: the eSagu credentials configured in Part 1
- Enable Send Headers and enter the following header:
| Name | Value |
|---|---|
accept |
application/json |

-
Enable Send Body.
-
Select the following settings:
- Body Content Type:
JSON - Specify Body:
Using JSON
- Enter the following JSON body:
{
  "priceSettings": {
    "minPrice": {{ $('Edit Fields - Extract meta objects by name').item.json['Min price'] }},
    "fixedPrice": {{ $('Edit Fields - Extract meta objects by name').item.json['Fixed price'] }},
    "maxPrice": {{ $('Edit Fields - Extract meta objects by name').item.json['Max price'] }},
    "mode": "{{ $('HTTP Request - Find item in eSagu via SKU')?.item?.json?.strategy?.priceSettings?.mode || 'OPTIMIZATION' }}"
  }
}-
Under Options → Response, enable Include Response Headers and Status.
-
Click Execute step.

The HTTP status 204 No Content confirms that eSagu successfully applied the price limits.
11. Test and activate the workflow
The completed workflow consists of the following steps:
Shopify Trigger - On product updatedWorkflow ConfigurationHTTP Request - Shopify MetadataEdit Fields - Extract meta objects by nameHTTP Request - Find item in eSagu via SKUIf - Check for eSagu API errorsEdit Fields - Simplify responseHTTP Request - Edit item

First, run a complete test with a single product. Then verify in eSagu that the minimum, fixed, and maximum prices were applied correctly.
If the test was successful:
- Save the workflow.
- Switch the toggle in the top-right corner from Inactive to Active.
From this point on, n8n responds to product changes in Shopify. Whenever a product is updated, the workflow retrieves its Amazon SKU and minimum price and updates the corresponding price limits in eSagu.
Use the workflow as a template for further automations
The workflow shown is not limited to Shopify or Amazon RePricing. It serves as a template for connecting any third-party system to eSagu:
- Retrieve data from a source system
- Prepare the required values
- Find the corresponding record in eSagu
- Transfer the data via the eSagu API
- Validate the response and handle errors
Instead of Shopify, the data source can be an inventory management system, an ERP or PIM system, a database, a CSV file, a webhook, or another API. In n8n, only the trigger and the steps for retrieving and preparing the data need to be adjusted.
The same principle can also be used with other eSagu APIs, including:
- RePricing for Amazon
- RePricing for eBay
- RePricing for Kaufland
- RePricing for OTTO
- Lost & Found
- HelpDesk
This makes it possible to transfer more than just price limits. Depending on the API used, you can, for example, search for and edit items, synchronize settings, retrieve cases, or automate HelpDesk processes.
The available endpoints, fields, and methods differ depending on the eSagu product. For additional workflows, consult the documentation for the relevant eSagu API and adjust the URL, HTTP method, parameters, and JSON content accordingly.